Bone Broth, Two Ways
Bone broth is a hot topic these days, but it’s been an important part of cultures across the world for millennia.
Not only is it a cost-effective way to add flavor and efficient to use the entire animal, it’s filled with gut-friendly benefits like collagen, calcium, magnesium, zinc, iron, copper, chromium, and phosphorous. Bone broth is simply stock made from the bones of an animal. Homemade is much lower in sodium than store-bought and fills the house with a warm, cozy smell.
Adding a splash of vinegar to the pot is an important step for extracting minerals from the bones. Having a variety of bone type adds variety in minerals. Rib bones provide a higher amount of copper (an important factor in iron absorption), magnesium (required for more than 300 biochemical reactions in the body), and chromium (important factor in fat and carbohydrate breakdown). Leg bones provide higher levels of calcium but require longer cooking times, as in greater than eight hours of traditional simmering.1
The risk of toxic metals being extracted during the stock making process is low.1 Just like anything, if large volumes are consumed for long periods of time, as in gallons daily for months, the risk increases. Commons sense and diversity in diet is key to good nutrition.
- Hsu, D.-jen, Lee, C.-wei, Tsai, W.-choung, & Chien, Y.-chung. (2017). Essential and toxic metals in animal bone broths. Food & Nutrition Research, 61(1). doi: 10.1080/16546628.2017.1347478
Super Simple Chicken Stock
Step One: Start a bone collection
Next time you pick up a rotisserie chicken or cook with bone-in chicken, save the bones and keep a collection in the freezer. Did you smoke a turkey for Thanksgiving? Those bones are outrageous as stock and really amp up the flavor of any soup. Your local butcher will also have a collection of bones for purchase if you’re not a collector, or don’t have the space.
Step Two: Add Aromatics
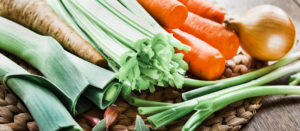 You weren’t going to throw those celery ends away, were you?! Similar to the bone collection, save your celery tops, onion butts, carrot ends, garlic that is beginning to be questionable, and herb waste. Keep them in the freezer until you’re ready to start a batch of chicken stock. If you don’t choose to do this, aromatics are generally inexpensive and can easily be picked up fresh from the grocery store. Delicious aromatic options include: whole peppercorn, star anise, cinnamon sticks, bay leaves, garlic, chunks of ginger, thyme, parsley, cardamom pods, coriander seed, or chilies. Find what you like and go for it.
Step Three: Choose your Vessel
Couple of options here:
- Large Stock Pot – Hey, it’s right in the name!
- Crock Pot – Set it and forget it.
- Instapot – Super fast, super easy and definitely my favorite.
Step Four: Add the goods
As a general rule of thumb, always place your bones and aromatics in the pot prior to filling with water. If done in the reverse, you may run out of room for the good stuff and have a watery mess on the counter! Ideally, the goods will take up ¾ of the pot. Add water to cover, a good glug of white or apple cider vinegar, and a good-sized pinch of salt.
Step Five: Turn up the heat
Stock Pot – Simmer, covered for a minimum of 8 – 12 hours. The longer the better. Stir occasionally.
Crock Pot – Set it and forget it for 12 – 24 hours.
Instant Pot – Pressure cook for 1 hour and allow natural release.
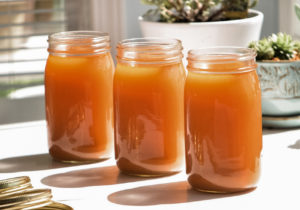
Once the stock/bone broth is no longer blazing hot, simply strain through a wire mesh strainer to remove the solids and allow to come close to room temperature before placing in the fridge overnight. The option to remove the fat layer at the top is totally up to you, just be careful not to take the jelly like substance because it’s the part filled with gut-friendly collagen!
Store in the fridge for up to 2 weeks, or in the freezer for up to 3 months. Use in soups and in place of water in savory recipes to kick up the flavor. Fill a mug and drink in place of hot apple cider or hot chocolate as a way to warm up in the winter.
Beef Bone Broth
Beef bones tend to be a bit scalier and more gunky. For this reason, an additional step of blanching is strongly encouraged. Although it takes a little time upfront, it will end up saving time by not having to skim the junk off the top after simmering.
Step One: Blanch
Take your pile of beef bones, place in a big stock pot, and cover with water. Bring to a boil and let simmer for 20 minutes while you watch the grossness float to the top. Once completed, dispose of water.
Step Two: Roast
Roasting the bones brings out some big flavor while giving the broth a beautiful caramel color. Although optional, it’s a great way to bring out the flavor.
Place blanched bones on a parchment paper-lined baking sheet. Bake at 375 F for about an hour, or until they are lovely brown color.
Just complete the same steps as the chicken broth including the splash of acid, and you’ll be rewarded with a comforting and nutrient filled beef bone broth.
Additional Tips & Tricks
 Once you find the method or the pot that works for you and your kitchen, this is a super easy process.
Quart mason jars work great for storing. Just be sure to leave a good amount of headspace in the jar if they are going into the freezer as the broth will expand. No one wants to open their freezer to find a big mess!
Roasting chicken bones also is a great flavor enhancer. Because they are smaller in size, they only need to be in the oven for about 20 minutes.
Roast the bones the day before, or prior to adding to the frozen bone collection. It will save time the day of broth production if you like the roasted bone option.
Use this fresh beef broth for your own homemade pho!
Bones can be reused more than once. Repeat use until they begin to disintegrate, usually around 3 times for chicken bones and 12 for beef bones.
Bone broth also makes a wonderful, soothing breakfast drink.
Written by Lorilyn Van Dyke, entegro
 New customers! Get 11% OFF your first Flourish order with Code FRESHSTART11

New customers! Get 11% OFF your first Flourish order with Code FRESHSTART11